COG-UK Docs
Authorising applications to use your Majora account with OAuth
At the start of September, we began the process of phasing out the use of the rotating API keys with an easier to use, well known, industry standard protocol for authorisation, called OAuth. Specifically, we use OAuth v2.0. This will change how you use external services that use your Majora account, such as the metadata uploader. It is important for you to remember that you are responsible for anything an authorised application does with your account, so you must take care when asked whether to authorise your Majora account. We provide some advice below.
What’s changed?
Instead of visiting the API key page on your profile, rotating your token and using this token to access external services. You can now visit the external service directly and “Sign in with Majora”. You will no longer need to be responsible for rotating your API token.
How will it work?
We focus on the authorisation flow for an external web application (such as the metadata uploader), but you are able to register your own application to interact with the API too. The flow is as so:
- Visit the external service which previously requested an API key
- Click the “Sign in with Majora” button
- If you are not already signed in to Majora, you’ll be directed to sign-in.
- Ensure you have been directed to the real Majora webpage by checking the URL.
- If you have any doubts, speak to
#account-requests.
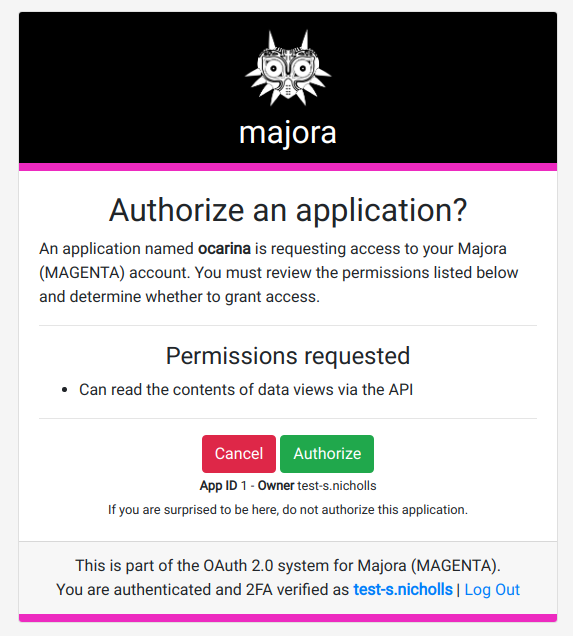
- Once signed in, you will be directed to an “Authorise application” page. Stop and take a breath: you alone are responsible for reading this page. You are looking for a few things:
- The URL will still be on the Majora website, the colour strips match the one for the website (e.g. the colour strips are magenta for the testing website).
- The application name appears to match the service you are trying to sign into
- The permissions the application is requesting seem sensible (e.g. the uploader should ask to be able to create and update samples and sequencing runs, but not read restricted metadata)
- The App ID and App Owner (below the buttons), match what you believe to be true about the application in question
- The footer will read
You are authenticated and 2FA verified as USER, whereUSERis your username
- If you are happy, click the green Authorize button and you will be directed to the service.
- Bask in the happinness that your life is no longer dominated by rotating API keys.
Example
An example authorisation page looks like this:

Remember
- You are responsible for anything an application does on your behalf.
- Through ease of use comes extra responsibility, you must be vigilant when you are being asked to give permission for a service to use your Majora account.
- If you are unsure, speak to
#account-requests. - Never authorize an application if you don’t know why you’re being asked to authorise it.
Published 2020-09-07. Updated 2020-09-07. Page maintainer @samstudio8.